CLICK HERE FOR FREE BLOG LAYOUTS, LINK BUTTONS AND MORE! »

Thursday 8 December 2011

Healthier Puppy Chow - Christmas Treat :)

I found this off of www.undressedskeleton.tumblr.com/SnackitySnacks which by the way has lots of great snack ideas! But I am quite in love with Puppy Chow... it's by far my favorite Christmas treat that I look forward to every year. However, this is EVEN BETTER because it's healthy(er), haha! I hope you all enjoy it as much as I did!!


Calories- 100 Total Carbs- 18 Fat -2g Fiber-5g Protein- 2
Makes 4 Servings
Ingredients:
  • 2 Cups Fiber one Honey Squares
  • 4 Tablespoons “I can’t believe it’s not butter”
  • 2 Tablespoons Creamy All Natural Peanut Butter
  • 2 Servings Truvia all Natural Sweetener.
  • 1 Package of Fat Free Sugar Free Vanilla Pudding Mix
  • 2 Squares of Reduced Fat Chocolate Almond Bark
Directions
  1. In a large mixing bowl melt butter, chocolate almond bark and  peanut butter. (I used the microwave)
  2. After melted pour cereal into mixture. Stir gently
  3. Let the mixture cool for a good 20 minutes.
  4. After mixture has hardened pour the mix into a large zip lock bag, add the box of pudding mix and shake gently until coated.

Tuesday 6 December 2011

A Party Platter You'll Love!

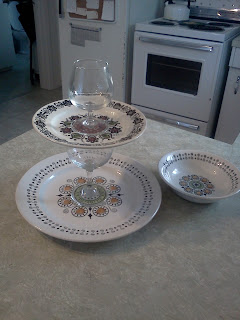
Ok people, this is such a cool idea and SO EASY to make!! My sister actually gave me this idea... I'm not sure if she saw it done before or if she made it up herself, but regardless this is fabulous and all your friends and family will be impressed! I even made one for my mom for Christmas this year because she has guest over a lot (shhh don't tell her!).

Here's what you need: 
1 small plate or small bowl
1 medium plate
1 large plate
2 cups of your choice
E-6000 glue or a glue similar to this


I used glass cups like these because in my opinion they look the best for this type of thing but you might find something even better! Oh, and did I mention that I got each plate and each cup for $0.10 each at my local thrift store!? Just 10 CENTS PEOPLE!! :) :) :)


If you really feel like getting creative you can put something in the glasses like marbles, pretty rocks, ribbon, you name it! 

First, take your largest plate and place a cup (I used the larger of my two cups) in the center of the plate like this

Once it's centered and you have determined exactly where it's supposed to go on the plate glue it on the plate.

Then, add your medium plate.... make sure the cup underneath is centered!! :)

Note: You might want to set the whole thing up first to determine where it is centered on each plate and then lightly trace with a pencil where your cup is supposed to go on the bottom and top of the plates. I had to do this on my first couple of ones until I got the hang of it.

Then of course add your next cup on top of the medium plate and glue it on as well.


Lastly, add your last plate (in my case a bowl) which of course is your small one. Make sure it's centered and then glue it on. 

Here's what it should look like in the end. 


I used a bowl on top so that I can put dip in it and serve chips and crackers on the two plates. Get creative and do what you like best! :)

The best part about this is you can choose your favorite color plates and glasses at your local thrift store, walmart, target, etc.! 

If you guys make one don't hesitate to post a picture of it, I'd love to see your creativeness! And I'd love to hear your testimonials on how you liked it!! 

And of course, remember to have fun while making it :) 
Have a grand day!
Cheers!

Saturday 19 November 2011

Knitted Ear Warmers - cuteness! :)

So this is the first thing I've ever knitted and I have got to say, I think I may be addicted to knitting now! It was SO easy, ya'll!! Give it a try... you'll fall in love with it's simplicity and uniqueness! You get to make anything your little heart desires :)


Here are two links to youtube videos that taught me how to knit:
1. http://www.youtube.com/watch?v=G9hv44QwQ-A
2. http://www.youtube.com/watch?v=mgwi3xgZzlk&feature=related

After watching those two videos I got all inspired and went to my local thrift store and bough multiple different sized needles for just 25cents, bargain? Yes! Luckily for me my thrift store has a craft section for used materials, I also bought about 20 balls of yarn for $2 (granted they weren't full sized yard they were smaller balls of yarn since they had been used) regardless, I got all sorts of different colors and I plan on making so many cute things out of them. As you can see, I first made my ear warmer and then I sewed on elastic to the ends to complete the circle and so that it would stay nice and snug on my head without sliding off. Easy peasy! Give it a whirl and tell me how yours turned out! :) If you need help or have questions don't hesitate to ask!

Monday 31 October 2011

My Husband, Brian

So I know this has nothing to do with homemade items but I saw this on facebook and just had to share it because it is so true. My husband definitely treats me like a princess and he was definitely raised by a queen :)
I love my sweet hubby :)

Thursday 22 September 2011

Spaghetti Casserole


Scooter’s Spaghetti


Recipe type: Entree
Author: Scooter
Prep time: 20 mins
Cook time: 35 mins
Total time: 55 mins
Serves: 10
Layered spaghetti casserole topped with french fried onions. A family favorite!
Ingredients
  • 8 ounces uncooked spaghetti
  • 1 pound ground beef
  • 1 large can spaghetti sauce (26.5 ounces)
  • 1 tablespoon butter
  • 1/2 cup chopped green peppers (I usually omit or substitute red peppers)
  • 1/3 cup chopped onions
  • 8 ounces cream cheese
  • 2 tablespoons milk
  • Fresh grated Parmesan cheese
  • French Fried Onions (small can)
Directions
  1. Cook spaghetti according to directions on the package. Cook to al dente, drain and set aside.
  2. Brown ground beef. Drain excess grease. Add spaghetti sauce to skillet and heat.
  3. Combine onions, peppers and butter in small glass bowl. Cover and microwave 4 minutes on HIGH until soft.
  4. Add cream cheese and milk to vegetables and stir well.
  5. Using a 10 x 6 dish, assemble in the following order:
  6. Thin layer of meat sauce on the bottom of the casserole dish.
  7. Spaghetti
  8. Cream cheese/vegetable mixture
  9. Spaghetti sauce
  10. Parmesan Cheese (amount subject to your own taste)
  11. French Fried Onions (added during last 5 minutes of cooking)
  12. Bake at 350 degrees for 25 minutes. Top with French Fried onion and continue baking 5 more minutes. (This is the secret ingredient–don’t let them burn.)
Notes
Make this ahead of time and refrigerate or freeze without the French Fried onions. Don’t forget to add them 5 minutes before casserole is finished cooking.
Found at: http://www.salad-in-a-jar.com/family-recipes/scooters-spaghetti

Monday 19 September 2011

Homemade Chalk Paint

Yesterday I showed you how to made sidewalk chalk paint... well today I found a way to make regular chalk paint to paint your walls with for kids! This clever craft only requires 2 ingredients!

Paint (any color or type that you want)
Non-Sanded Tile Grout

For every 1 cup of paint use 2 tablespoons of grout. Mix and paint :)

You can find the non-sanded tile grout at any home hardware store (Home Depot, Lowes, etc.). Have fun!!

Thanks http://www.theidearoom.net/2010/09/make-chalk-rocks-and-homemade-chalk.html for the clever craft!

Wooden Picture Decoration

For this glorious project all you need is:

gel medium (which can be found in the paint section at any craft store and probably walmart too)
block of wood
mod podge
picture on a regular piece of typing paper (printed from your computer is fine)
wet cloth for rubbing off residue
paint brush

Here is a youtube link that's only about 2 minutes long showing you how to do it for you visual people :)
http://www.youtube.com/watch?v=_NjYbAAQ4vw

Take the block of wood and put gel medium on it with a paint brush. Then, place your picture face down onto the block of wood and let it sit over night. The next day, use the damp cloth and your fingers to rub away the paper. Once all the paper is off use a paint brush to apply mod podge all over the picture. Let it dry. Then YOU'RE DONE! :) Enjoy!

Here's a picture of one that someone did that I found on www.readymade.com

Sunday 18 September 2011

Homemade Sidewalk Chalk Paint

Sidewalk chalk paint for kids!! How fun :)

I found this on www.erinlincoln.blogspot.com, so creative and fun! All you need is corn starch, water, food coloring, muffin trey, and foam brushes. Just add a little bit of corn starch and water and then pour your "paint" mixture into the muffin trey and add whatever color food coloring you'd like. Then, take it outside, give the kids the foam brushes and let them have at it! They can paint the town red if they'd like ;)

Don't worry, it dries just like chalk and will wash off with the next rain. So let them have a blast while they're still young. :)

Friday 9 September 2011

Easy Way to Clean Microwave!!

Easy way to clean your microwave - heat a bowl of water and vinegar for 5 minutes, the steam will dissolve stuck on stains. Simply wipe off.

Sweet Potato Donuts!

Thanks to the delightful bog: http://leannebakes.blogspot.com/2011/09/spiced-sweet-potato-donuts.html I discovered these wonderful things! I simply just copy and pasted her recipe so that others can see how awesome this is! She goes into greater detail on her blog about these donuts and she shows more pictures, so feel free to check out her blog! :)


Ingredients:
1 cup mashed sweet potato total (I used 2 medium-sized potatoes)
3 tbsp unsalted butter
½ cup milk (I used whole)
2¼ tsp instant dry yeast
½ cup granulated sugar
½ cup packed light brown sugar
1¼ tsp sea salt
¼ tsp ground nutmeg
1 tbsp vanilla
1 extra large egg
2 extra large egg yolks
3.5 cups bread flour, plus more for rolling

Cinnamon Sugar Coating:
1 cup sugar
1 tsp cinnamon
4 tbsp unsalted butter, melted

Directions:
Prick the sweet potato several times with a fork and microwave for 8 minutes, until tender.  Cut the potato in half and scoop the flesh out.  It will be hot. Be careful. Mash it up with a fork.

Melt the butter, and let it cool.

In the microwave (or a saucepan if you’re fancy) heat the milk to just below 105F. Any higher will kill your yeast dead.

In the bowl of a stand mixer fitted with the whisk attachment, let the yeast and warm milk sit for 5 minutes until foamy.  Add the sugar, brown sugar, salt, vanilla, nutmeg, and whisk to combine.  Add the mashed sweet potato, butter, egg and egg yolks, and beat until well combined.

Change to the dough hook, and add the flour.  Mix at medium for 2 minutes, then bump the speed up to medium high and knead until a soft dough forms and the sweet potato dough pulls away from the sides and toward the centre, about 5-7 minutes.  If it doesn’t pull together, add a little bit more flour.

Dump the dough out, form it into a ball, and let it rise on the countertop for 2 hours (don’t be alarmed if it doesn’t rise all that much… it won’t).

Gently redistribute the yeast by kneading lightly, and then roll the dough out onto a lightly floured surface.  ¾ of an inch works. (Or 1.5cm if you’re Canadian like me!)

Using a circle cutter, gently cut out circles and poke the middles to make holes. If you have a donut cutter like I did, even better! It will do the annoying hole part for you. Place the doughnuts on two parchment paper lined sheet pans, and let them rise for 2 hours, covered with plastic wrap.

Preheat the oven to 400 degrees F.   Bake the doughnuts in the centre of the oven for about 10 minutes, until ther have risen and are golden brown (they should be 200 degrees F on an instant read thermometer).

While the doughnuts are baking, make the cinnamon sugar topping by melting the butter in one bowl, and whisking the sugar and cinnamon in another.  While the doughnuts are hot out of the oven, toss them in the butter, then immediately toss in the cinnamon sugar.

Thursday 18 August 2011

Pumkin Spice Fudge

Feeling "fall"ish? :) Well here's a fun and tasty (but not healthy lol) thing to make! I discovered this on www.auntpegsrecipebox.blogspot.com and it's absolutely delicious! So have at it! :)

2 c. sugar
1 c. brown sugar, packed
3/4 c. butter (no substitutions)
2/3 c. evaporated milk
1/2 c. pumpkin puree
1 1/2 tsp. Pumpkin Pie Spice
1 (12 oz.) pkg. white chocolate chips
1 (7 oz.) jar Marshmallow creme
1 c. chopped pecans or macadamia nuts (optional)
1 1/2 tsp. vanilla extract
 
 
Butter a 9 x 13 baking dish.  Combine the first 6 ingredients in a heavy saucepan: cook over medium heat until the sugars dissolve, then continue cooking until the mixture begins to boil, stirring constantly.  Boil until a candy thermometer reaches the the soft-ball stage (234 ~ 243 degrees). Remove from heat, stir in the white chips until they are all melted and mixture is smooth. Add the remaining ingredients, mix well. Pour into prepared pan, and cool to room temperature. Cut into squares, store refrigerated in an air tight container. Makes approx. 60 pieces.
Note: The total boiling time is around 30 minutes.

Thanks Aunt Peg! 

Rainbow Rice for Replacing Play Sand

This is from www.shareandremember.blogspot.com and it's such a great idea for kids to play in!

Measure out the rice (4 cups) and put it in a Ziploc bag with about 2T of food coloring or liquid water colors (works great!) and 3T of rubbing alcohol. The kids can help mix the rice in the bags to spread the color. Put them on pans to dry in the sun. It all dried incredibly fast.

 Now remember, folks, this is probably the prettiest it'll be... once the kids touch it all the colors will be mixed together ;) haha but they'll love it!

Bloomin' Onion Bread

I came across this on www.the-girl-who-ate-everything.com and it's delicious!!
1 unsliced loaf sourdough bread
12-16 ounces Monterey Jack cheese, thinly sliced
1/2 cup butter, melted
1/2 cup finely diced green onion
2 teaspoons poppy seeds
Directions:
Preheat oven to 350 degrees.
Cut the bread lengthwise and widthwise without cutting through the bottom crust. This can be a little tricky going the second way but the bread is very forgiving.

Place on a foil-lined baking sheet. Insert cheese slices between cuts. Combine butter, onion, and poppy seeds. Drizzle over bread. Wrap in foil; place on a baking sheet. Bake at 350 degrees for 15 minutes.
Unwrap the bread and bake 10 more minutes, or until cheese is melted.

Friday 5 August 2011

Swedish Baked Potatoes - Delicious!

Swedish Version of Baked Potatoes Method Preheat the oven to 425˚F (220˚C). Put the potato on a chopping board, flat side down. Start from one end of the potato, cut almost all the way through, at about 3 to 4 mm intervals. Arrange the potatoes in a baking tray and insert the garlic in between the slits. Scatter some butter on top of each potato. Then drizzle the olive oil and sprinkle some sea salt and freshly ground black pepper. Bake the potatoes for about 40 minutes or until the potatoes turn crispy and the flesh is soft.


Thanks for the instructions and pictures www.foodgawker.com!! 

Recyled Coffee Can into Bag Holder

Here's a great way to keep all those crazy, loose, plastic bags in tact! I came across this today on another blog and loved the idea. Once you're done with your coffee (which shouldn't take too long if you're like me ;)), use your empty can, take a knife and cut a small slit on the lid. Then, stick your baggies inside and TA-DA it's done! :) Ps. You might wanna peal of the coffee label and decorate the tin a bit ;) or maybe that's just me being the crazy person that I am, haha. Enjoy!


Picture and idea by: www.creatingahouseofgrace.blogspot.com

Newspaper Gift Bags

Gift bags can be expensive but here's a fun and creative way to make your own out of newspaper!
Find a page that you like in a newspaper and cut it 14 inches long and 6 inches high. Then (as pictured) fold the triangular paper into 4 places (4.5", 3", 4.5", 3") and glue the two open ends together to make a 3d box. Then, just like wrapping a gift, fold down the edges and clue them together to create the bottom. Lastly, take a ribbon or sting and string it though near the top (be careful not to cut holes too close to the top unless it might rip). And you're done!


Discovered on: www.pinterest.com

DYI Outdoor Swing

Have a chair that has broken legs? Here's a splendid idea of what you can do with it! Just go buy some strong rope, drill holes in the chair, string the rope through the holes and tie the rope sturdily onto a strong tree.

Easy as pie!


Idea and picture by: www.poetichomes.com

Wednesday 3 August 2011

Keep Bugs Out of Your Pantry

So as much as I hate to admit it, Martha Stuart does have some nifty ideas.... this being one of them. To keep your pantry a bug-free pantry try this little tip: try taping whole dried bay leaves to the sides and bottoms of your shelves.

It actually works! lol

Brought to you by: www.marthastuart.com

Monday 1 August 2011

Funny Christmas Cookies

What you need:

Your favorite cookies
Marshmellows
White icing
Red and brown food coloring
A fun imagination

The rest is up to your imagination! Have fun!! :)

15 Natural Beauty Recipes from Natural Sources

Brown Sugar and Honey Facial Scrub
This is probably my favorite one. Brown sugar exfoliates the skin ridding the pores of all dirt, oil and dead skin cells causing blemishes. Honey is naturally antibacterial, so as the brown sugar cleans out the pores, the honey cleans out the sources for this build up to prevent future break outs.
Coffee Grounds in Conditioner
This one is really simple. Instead of throwing old coffee grounds away, toss them into your conditioner to make your hair extra shiny. That’s all it takes!
Replace Conditioner with Vinegar
To get rid of the usual problems with hair: build up, dullness and just lack luster, replace your conditioner with vinegar 1-4 times a month, depending on your own hair. Just use it as you need it. And don’t worry about buying the best stuff for the best results, common white vinegar will do the trick as well as any other vinegar.
Olive Oil as Hair Moisturizer
It’s easy to see how oil can moisturize your hair. It’s simple to use it as well. Simply cover your hair in olive oil and leave it in for 30-45 minutes. You can also wrap it in plastic wrap to keep it from dripping and some believe it enhances the effect.
Lemon and Egg Facial
Have red splotchiness on your face? Soothe both symptoms away easily by mixing together one egg yolk and the juice of one lemon into a paste. Cover your face with it and leave it on overnight. If this seems like too much work, leave it on your face for an hour. You might not get the optimal results with this, but you will see a difference.
Replace Conditioner with Baking Soda
Want to be more like a guy and only use one thing to clean your hair? Then just add baking soda to your shampoo. It will remove build up and make hair shinier, and you can use it everyday.
Degrease Oily Hair With Lemons and Aloe
Mix together 1 tablespoon of lemon juice and 1/2 teaspoon aloe vera. Mix it together with a normal serving of shampoo. It will get rid of your oiliness in one shower.
Smooth Fizzy Hair With Honey
Add a tablespoon of honey to a litre of water. After shampooing, rinse your hair with this concoction to tame your frizz.
Replace Face Wash With Skim Milk Powder
Switching face wash out with skim milk powder can make your face much softer and give you a smoother complexion. It’s also very gentle, so even the most sensitive can use it.
Moisturize Skin With Honey and Olive Oil
Honey holds moisture extremely well and olive oil hydrates well, too. Mix equal parts of olive oil and honey and add a dash of lemon juice if you’d like to create a pasty lotion. Rub it onto the dry skin and let it sit for 10-20 minutes. Your skin will be hydrated for plenty of time to come afterwards.
Soften Skin With Oatmeal
There are many concoctions and mask recipes that involve oatmeal, but you can use oatmeal by itself to help your skin. Ground up about 1 cup of oatmeal using a blender or coffee grinder, and add it to bath water to soften skin to baby-like quality.
Treat Choline-Damaged Hair
Mix together 1 egg, 2 tablespoons of olive oil and 1/4 of a peeled cucumber. Cover you hair with the mixture and leave on for 10-20 minutes. You’ll see your hair return to normal almost immediately.
Tone and Rebuild Skin With Avocados and Carrots
This recipe can work wonders. Combine 1 avocado, 1 cooked carrot, 1/2 cup heavy cream, 1 egg and 3 tablespoons of honey. Leave on for 10-20 minutes and then rinse. These ingredients add a multitude of vitamins, antioxidants and calcium to rebuild natural collagen, tone skin and remove age spots. There is plenty to read about the benefits of each of these ingredients, but all you need to know is that each natural element does more than any store-bought item can.
Lemons or Oranges for Fine Hair Hairspray
Use Lemons for dry hair and oranges for a stronger hold. Chop up the entire piece of fruit in a bowl as to not lose any juice. Boil the fruit with 2 cups of water until soupy or when the liquid has been significantly reduced. Strain through a cloth and put into a spray bottle. The citrus will hold the hair and not damage it due to the fact that there is no alcohol.
Apple Cider Vinegar for Cleanser and Toner
This eliminates dead skin cells easily, so you can use in lieu of expensive toner. That’s all
there is to it!
 
Brought to you by www.inspiringpretty.com

Sunday 31 July 2011

Homemade Dehumidifier

This is actually extremely easy!! Take a bundle of chalk and hang it in your closet. It will absorb extra moisture and keep clothing fresh and dry, and takes up much less room than an electric dehumidifier.


 Brought to you by Martha Stuart

Homemade Dish Washer Soap

Homemade Dishwasher Detergent
What you need:
1 Cup of Borax
1 Cup Baking Soda (or Washing Soda)
1/2 Cup Kosher Salt
1/2 Cup Citric Acid (You can purchase "Fresh Fruit" in the canning isle. It is a produce protector or you can puchase 15 packets of lemon Kool-aid, the unsweetened kind, and that works as well.)

Mix all ingredients in a container and voila! Dishwasher detergent! Use 1 Tbsp per load PLUS add some vinegar to the rinse aid portion of your dishwasher (this keeps the plastic from getting a cloudy look) and wash away!

Brought to you by crazycraftbugs.blogspot.com

Homemade Burts Bee - Lip Balm

This is an awesome receipt for lip balm that looks, smells, and acts just like Burts Bees!
What you need:
  • 3 tsp. grated or roughly chopped beeswax
  • 6 tsp. coconut oil
  • 1 1/2 tsp. lanolin
  • 3/4 tsp. vitamin E
  • 2 tsp. hard honey (or 1 tsp if liquid honey)
  • 3/4 tsp. peppermint essential oil
  • A few small tins or containers with lids

Directions

  1. In a small pot over medium low heat melt beeswax, coconut oil, lanolin and vitamin E. Use chopstick or other small, longish stick to stir (chopstick is perfect).
  2. Remove from heat and add honey and peppermint oil. Whisk well with chopstick and try to distribute oil throughout the mixture - this is tricky.
  3. Pour quickly into tins or jars. Let cool on counter till hard.
This recipe makes enough for 3 - 3/4 oz tins (see photo for size) and one 1 1/2 oz jar. You can reuse cosmetic jars like old hand lotion jars or foundation jars.

Note: Do not keep it in a hot place like in your car on a hot summer day because it could melt leaving a sticky mess. Just keep it with you in your purse if you're in air conditioning or leave it at your house. :)

Some people are allergic to lanolin. If you're making these for gifts you may want to label them.

Brought to you by and pictures by: http://fimby.tougas.net/homemade-lip-balm-recipe

Etching into Glass- EASY!

Who knew that etching glass was so simple? I sure didn't until I came across this today!

What you need:
Armour Etching Cream
Paint Brush
Glass (ex. cup)
Exacto Knife or Sharp Scissors
Masking Tape
Marker

Directions:
Take the masking tape and tape it onto the glass surface and then write with the marker the word that you want to say (make sure you write it in block form). And then cut the word out with your knife/scissors.
Next, take your etching cream (please wear gloves unless it could hurt!) and your paint brush and brush the cream over your word. Then let it sit for about 5-7 minutes. Next, rise it off (but be careful not to let the cream touch anything unless it could get etched too!) and peel the tape off as you're rinsing it.

And then you're DONE! :) ta-da!!
Pictures and idea by youseriouslymadethat.blogspot.com

52 Things I Love About You - Book

Here's a fantastic anniversary idea!

Take a deck of cards and make a "52 Things I Love About You" book. Like this:

You can decorate yours however you'd like. :)
Then get creative and write 52 reasons why you love your significant other.
And glue it on! :)

Stamping Cookies!

What a fabulous idea I came across today! Take stamps and stamp designs into your cookies for whatever the occasion might be!

Brought to you by countryliving.com

Crispy Parmesan Greenbeans

So Brian and I had these at TGIF a couple months ago and absolutely LOVED them. So I realized I needed to figure out how to make them and this is what I came up with:

Greenbeans (not canned)
2 egg whites
1/4 cup flour
1 cup seasoned panko breadcrumbs
1/4 cup parmesan cheese
salt and pepper

Preheat oven to 425 degrees. Lay a wire rack on a baking sheet and coat with non-stick spray.
Snap off the tough ends of each greenbean if it didn't come that way. On two separate plates, add the eggs whites (lightly beaten) and the panko + flour + cheese. Season the panko mixture with salt and pepper if desired. Coat each greenbean in egg whites, then lay in the panko mixture and thoroughly cover. If the panko won’t stick, dip back in the egg whites and roll in panko once again. Lay each greenbean on the wire rack.
Serve with Caesar salad dressing as dipping sauce (which is our favorite dipping sauce for these but Ranch is tasty too!!

You can also do this with asparagus but we like the greenbeans best! :)

Inspired by howsweeteats.com

Saturday 30 July 2011

Homemade Laundry Soap!

Are you sick of paying SOOO much on laundry detergent? I am! Here's a great way to save a ton of money and still get your clothes squeeky clean! It should last you at the very minimum 9 months and at the max 1.5 years!! Now THAT my friends is awesomeness!! :) You only need 1 tablespoon per load! And it's not too sudsy so it should be safe for High Efficiency Washers.

1 4 lb box Borax
1 4 lb box Arm & Hammer Baking Soda
1 4lb box Arm & Hammer Washing Soda
3 bars of Fels-naptha soap
2 small containers of oxyclean or store brand oxyclean
(this is optional, depending on how messy your family is lol)

(you can also use pink Zote soap instead of Fels-naptha which can easily be found at Home Depot)
You should be able to find all of these at your local grocery store.


 Start out by grating your Fels-naptha soap just like cheese. You can use a food processor or just use your hand held grater, what ever you have. Toss all ingredients in a 5 gallon bucket lined with a garbage bag. This part makes your whole house smell great. Once everything is mixed store soap however you like. I chose a jar that I keep above my washing machine, I also got a little scoop to keep inside. Wasn't that easy? Sure was! Enjoy your soap. And remember, all you need is 1 tablespoon per load because it's stronger than your average store-bought detergent. :)

Brought to you by: beingcreativetokeepmysanity.blogspot.com

Cheesecake Brownies - YUM!

So I followed these instructions for this Red Velvet Swirl Cheesecake except I left out the red dye and it turned out to be cheesecake brownies ~ YUM!!

What you need:
  • Butter – 8 tbsp (1 stick) – melted
  • Sugar – 1 cup
  • Vanilla Extract – 1 tsp
  • Coco Powder - 1/4 cup
  • Red Food Coloring – 1 tbsp (I didn't use this)
  • Vinegar – 1/2 tsp (original recipe is 1 tsp)
  • Eggs – 2
  • All Purpose Flour – 3/4 cup
Cheesecake Layer:
  • Cream Cheese – 8 ounces (softened)
  • Sugar – 1/4 cup
  • Egg – 1
  • Vanilla Extract – 1/8 tsp
Directions:
1. Preheat the oven to 350 degrees and grease a baking tray.
2. Melt Butter
3. Add sugar and vanilla extract and blend.
4. Add cocoa powder, red food coloring, and vinegar.  
5. Blend well
6. Add blended eggs
7. Gently fold flour into the mix
8. Pour 3/4 of the batter into the prepared pan and reserve a 1/4 batter for later.
9. In a separate bowl combine the cream cheese, 1 egg, sugar, and vanilla extract.  
10. Blend until smooth and creamy
11. Add the cream cheese layer over the brownie mixture. And spread.
12. Add the remaining red velvet (brownie) batter. 
13. Swirl to make it look pretty like marble
14. Into the oven for 30 minutes exactly – DO NOT OVERBAKE.

Serve warm and ENJOY!! :D

Lamp Shade - Creativity

This is super easy to do and you don't have to sew!! You can either go to your local thrift store and find a lamp that you want to decorate or decorate one that you already have. Than, go to the store and buy some ribbon and start your fun!

What you need:
Lamp Shade
Ribbon
Hot glue gun, fabric glue, or anything creative enough to keep the ribbon attached to the lamp :)

Then start by measuring your ribbon in accordance to the size of the shade. Next you'll attach the ribbon to the top of the shade, go at a slight angle with the ribbon and then attach it to the bottom of the shade. Then take the next ribbon and weave. It's that easy!

Enjoy!!

Brought to you by www.midwestliving.com

Art

Run crayons through a hot glue gun machine and create your own design! Instant awesomeness!

Friday 29 July 2011

"Book" Shelf Idea

The word "book" is taken seriously in this idea! ;) 

Just buy a couple wall hooks that people usually put a shelf on top to make a shelf but instead use a book! Its way cuter and it'll save you money on the actual shelf! These hooks can be found at places like walmart, home depot, office depot, etc. and they're only about a buck or two. Enjoy!

Cool Anniversary Idea

Every anniversary take a picture of you holding a picture from the year before. Love this idea, its so fun!

Fabric Softener - Money Saver!

Now this fabulous idea came from apartmenttherapy.com.

Here's what you do:

Take your favorite liquid fabric softener and soak an old hand towel completely with the it. Wring it out and let it dry, then throw it in with your next load just like you would a dryer sheet. This mega-fabric softener sheet should be good for at least 40 loads of laundry, stretching out softener use and lessening waste.

Homemade Marshmellows

Who knew you could make homemade marshmellows? I sure didn't until I came across this today on momentsofmommyhood.com (which fyi isn't just for moms! lol).

Here's what you need:
2 1/2 tablespoons of unflavored gelatin 1/2 cup of cold water 
1 1/2 cups granulated sugar 
1 cup light corn syrup
1/4 teaspoon salt 
another 1/2 cup of water 
2 tablespoons of vanilla extract powdered sugar
    Directions:
    1. Combine the gelatin and 1/2 cup of water in the bowl of a heavy duty stand mixer. (this is not a job for a hand mixer) Allow that to stand for about 30 minutes.

    2. In a small saucepan, combine granulated sugar, corn syrup, salt, and the other 1/2 cup of water. Stir over low heat until the sugar is dissolved.

    3. Turn the heat to high and cook the mixture until it reaches 240 degrees on a candy thermometer. (about 12 minutes)

    4.Remove the pan from the heat and slowly pour this mixture into the gelatin mixture. Mixer set on low, with the whisk attachment.

    5. Once you have added all the syrup mixture, increase the speed to high and continue beating until the mixture becomes thick and white. It can take about 15 minutes, but my mixer started making a strange noise about 12 minutes in, so I stopped there.

    6. Add the vanilla. Mix it in.

    7. Oil a 13x9 inch baking pan and dust it generously with powdered sugar. This is very important! The powdered sugar is the key to getting the sticky marshmallows out of the pan when they are set.

    8.Pour the marshmallow mixture into the pan, sprinkle with more powdered sugar, and allow them to set up over night.

    9. Run your knife around the outside of the pan to loosen the marshmallows and pull them out. Cut into squares and dust with more powdered sugar so they don't stick together.

    Homemade Pretzels

    I found this on the website called momentsofmommyhood.com, they actually have a lot of great and fun crafty ideas!

    What you need:
    1 packet of yeast
    1 1/2 cups warm water
    1 tablespoon sugar
    4 cups flour
    1 teaspoon salt
    1 beaten egg
    Course salt to sprinkle on top (if desired) 

    Instructions:
    Mix the water and yeast together in a bowl until the yeast is completely dissolved. Add salt, sugar, and flour. Mix and knead until the dough is smooth. Roll and shape the dough into any shape you desire. Place pretzels on a greased cookie sheet and brush them with the beaten egg. Sprinkle lightly with  course salt. Bake in a 425 degree oven for about 15 minutes or until golden brown.

    ENJOY!!! :D

    Homemade Fingerpaint

    Ladies and gentlemen, look what I came across today! This is super cool, fun, and easy! Kids will love helping out with this but if you don't trust them making it than they will love the fact that you made it for them too. :)

    What you need:
    1 envelope unflavored gelatin
    cold water
    1/2 cup cornstarch
    4 tablespoons dishwashing liquid
    food coloring
    4 to 6 baby food jars

    Directions:
    1. Stir the gelatin into 1/3 cup cold water; set aside.
    2. Measure the cornstarch into a saucepan and stir in 2 1/2 cups cold water until dissolved.
    3.Bring the mixture to a simmer and stir until thickened.
    4.Remove the pan from the heat and blend in the gelatin mixture and the dishwashing liquid.
    5. Allow the mixture to cool and spoon it into jars.
    6.Stir in a generous amount of food coloring.
    7. Store at room temperature in airtight containers.

    Rag Wreath - Cute!

    This adorable rag wreath is super easy to make. I came across it today on another blog. She didn't give a step by step so I recreated my own. The picture is the one that she made but mine looked very similar.

    Here's what I did:

    I got a wire hanger from my closet and twisted it around into a circle. Than, I got a bunch of cute scraps that was laying around in the craft room and cut them into strips of about 6 inches long and 1 inch wide (give or take). Lastly, I started tying the strips around the circled wired-hanger and ta-da! The wreath was done after about 30 minutes of tying.

    To hang the wreath up, I got a string/rope that was about 10 inches long and then folded it in half so that it was a loop and only about 5 inches long. I then tied it in a knot with the wired hanger being inside the loop and then hung it on a hook. Easy-peasy! :)

    Thursday 28 July 2011

    Secret Message Banana

    This is a lot of fun for kids or even to surprise your honey when you hand him/her a banana to bring to work in the morning.

    First, take a toothpick and poke out a message, it won't show up until later on in the day and then suddenly the secret message arises! Total coolness and fun! :)

    Sweet Acorns!

    Now THIS my friends, is a delicious and fun project!

    To make these adorable and delicious little treats all you need is:

    Kisses
    Small Vanilla Waffers
    Peaunutbutter chips
    Icing

    After you get your ingredients the rest of fairly self-explanatory but for you people who must read to understand I will give you a step-by-step process. :)

    First, take the kisses and put just a smidge of icing on the bottom. Next, take the waffer and put the flat side of the kiss to the flat side of the waffer. Last but not least, put a smidge of icing on the peanutbutter chip and stick it on the center of the rounded side of the waffer. Then enjoy!! :)